Welcome
to BizStream Academy!
WIFI:
BizStream-Public
Password: BZSInternet
Who is everyone?
A little bit about BizStream and BizStream Academy...
Who is everyone?
Mentor and student Introductions
- What is your name?
- If you could build an AI to do one thing for you for the rest of your life, what would it be?
Why do we do this?
- Programming is awesome!
- Tech = Great Jobs, Great Opportunity & a Great Future
- You can dive into learning code at anytime and find your passion
Random Information
- Water
- Snacks
- Bathrooms
Tour Time!
Lets Get Started!
But before we get to coding...
Setting up our workspace
- Go to https://glitch.com/
- Sign in with either Google or email
- Go to https://bizstream-academy-template.glitch.me/
- Click the "Remix on Glitch" button
- Congrats! Your own website!

Setting up our workspace
- Select Settings in the left sidebar and click on Edit project details
- Change Project Name to whatever you want and hit Save!
tip: make it something you'll remember 🙂
(Optional)
- At the bottom of the screen click Preview and select Preview in a new window
Lets Break Down These Files...
Anatomy of a website
Your Content
+ HTML: Structure
+ CSS: Presentation
+ JS: Interactivity
= Your Website
A website is a way to present your content to the world, using HTML, CSS, and JS to present that content & make it look good.
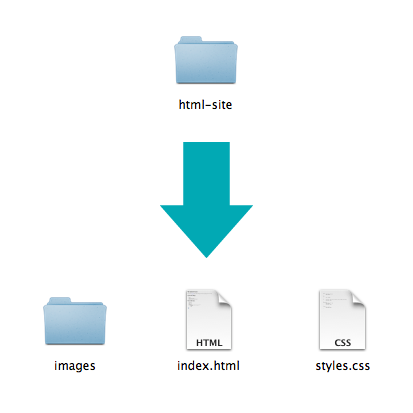
Get Started: Folder Structure
A website is basically a folder that holds a bunch of files
This includes:
- HTML Files
- CSS Files
- Images
- Script files
- Anything else that will appear on your site
Note: File names should not include spaces or special characters. File names ARE case sensitive.
Enough Talk, Let's Code #1
- Click on index.html
- Find line #34 and change "World" to your name
- Watch it change, feel the power 😈
What is HTML?
HTML stands for HyperText Markup Language.
HTML is the programming language used on EVERY website. It
is what the browser uses to render a web page by reading the tags
and interpreting the content of the web page.
HTML consists of tags enclosed in angled brackets <html>,
also known as elements, and most commonly come in pairs, with a
beginning and an end. HTML is styled using CSS.
Tip: Use the “View Source” option when viewing ANY web page
Enough Talk, Let's Code #2
- Click on style.css
- Find line #19 and change #24455a to beige
- Watch it change, feel the... boring-ness? 🤔
CSS: What is it?
CSS = Cascading Style Sheets
CSS is a "style sheet language" that lets you style the elements on your page.
CSS works with HTML, but is not HTML itself.
CSS: What can it do?
Colors, positions, and sizes
Enough Talk, Let's Code #3
- Click on script.js
- In your preview, click on "Hello {{Your Name}} and notice how... nothing happens
- Find line #13 and change button to h1
- Click on "Hello {{Your Name}}" over and over again
- Ooh and Aaah
- Go to the end of line 17, press Enter, and type:
btn.textContent = "Whoa"; - Click on "Hello {{Your Name}}" one more time
- Whoa 😲
What is JavaScript?
JavaScript is a programming language that allows you to implement complex things on web pages
It makes your site dynamic
It is instructions for interactions that happen on your site
(ex. click, scroll, hover)
So, back to HTML
Head on back to index.html
Anatomy of an HTML element
-
Element
- An individual component of HTML
- Paragraph, heading, table, list, div, link, image, etc.
-
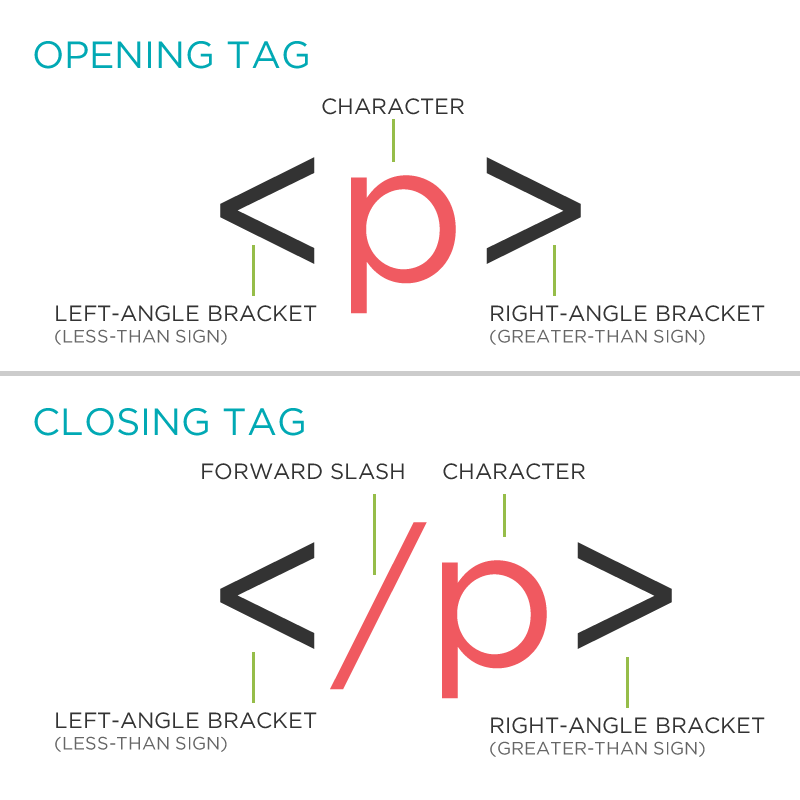
Tag
- Marks the beginning & end of an element
- Most have an opening tag and closing Tag
-
Tags contain characters that indicate the tag's purpose
<tagname>Text/content that will be visible</tagname><p>This is a sample paragraph.</p><img src="img/my_picture.png" />
Tag Breakdown
Head and Body Tags
Head: The head contains information about your site used by things like search engines and links to other files.
Body: The body contains the actual content of the
page. Everything that is visible to the user is contained in the body.
(this is where we'll do most of our work today)
Nesting
All elements "nest" inside one another
Nesting is what happens when you put elements inside other elements.
Nesting: Example
Elements are 'nested' inside the <body> tag.
<body>
  <p>A paragraph inside the body tag</p>
</body>
Paragraphs 'nested' inside list items.
<ul>
  <li>
    <p>A paragraph inside a list item</p>
  </li>
</ul>
Element: Paragraph
<p>Paragraph 1</p>
<p>Paragraph 2</p>
<p>Paragraph 3</p>
<p>Paragraph 1</p>


<p>Paragraph 2</p>
<p>Paragraph 3</p>
<p>Paragraph 1</p>
<p>Paragraph 2</p>
<p>Paragraph 3</p>
Paragraph 1
Paragraph 2
Paragraph 3
* White space is only for humans. You can write your code with any spacing.
Element: Heading
<h1>Heading 1</h1>
<h2>Heading 2</h2>
<h3>Heading 3</h3>
<h4>Heading 4</h4>
<h5>Heading 5</h5>
<h6>Heading 6</h6>
Heading 1
Heading 2
Heading 3
Heading 4
Heading 5
Heading 6
* Heading number indicates hierarchy, not size. Think of outlines from high school papers
Example: Headings
Formatted text
<p>
    Here is a paragraph with <em>emphasized</em> text.
</p>
<p>
  Here is a paragraph with <strong>important</strong> text.
</p>
Here is a paragraph with Emphasized text.
Here is a paragraph with Important text.
Can you find an example of each on your site?
Enough Talk, Let's Code #4
Let's add some content to our HTML about a topic of your choosing
Add a couple of heading with 1-2 short paragraphs of text below each heading
Use <strong> and <em> within a few paragraphs
Attributes & Values
-
Attribute
- Provides additional information about the HTML element
- Class, ID, language, style, identity, source
- Placed inside an opening tag, before the right angle bracket.
-
Value
- Value is the value assigned to a given attribute.
- Values must be contained inside quotation marks.
-
<div id="copyright">©BizStream Academy logo 2023</div>
<img src="my_picture.jpg" />
<a href="http://www.bizstreamacademy.com">
  BizStream Academy
</a>
Element: Link
Links have three components
- Tag: <a></a>
- Href attribute: "http://www.bizstreamacademy.com"
- Title attribute: "BizStream Academy"
<a href="http://www.bizstreamacademy.com" title="BizStream Academy">BizStream Academy</a>
The <a> tag surrounds text or images to turn them into links
Link Attributes
Links can have attributes that tell the link to do different actions like open in a new tab, or launch your e-mail program.
<a href="home.html" target="_blank">Link Text</a>
Link opens in a new window/tab with target="_blank"
<a href="mailto:sponsorships@bizstream.com">E-mail us!</a>
Adding mailto: directly before the email address means the link will open in the default email program.
Enough Talk, Let's Code #5
Let's add some links to our HTML!
Add links that open in the same window, a new window and link to an e-mail address.
Element: Image
Images have three components
- Tag: <img />
- Src attribute: "http://www.bizstreamacademy.com/ACADEMY/media/Images/academy-logo.png"
- Alt attribute: "BizStream Academy logo"
<img src="academy-logo.png" alt="BizStream Academy Logo"/>
* Notice: This tag is our first example of a stand-alone or "self-closing" element.
Enough Talk, Let's Code #6
Let's add a few images to our page.
Find some images you want to upload to your assets folder
Copy the CDN absolute path
Use that URL as the src for the image
Element: Unordered and ordered lists
<ul>
  <li>List Item</li>
  <li>AnotherList Item</li>
</ul>
<ol>
  <li>List Item</li>
  <li>AnotherList Item</li>
</ol>
Unordered list (bullets)
- List Item
- Another List Item
Ordered list (sequence)
- List Item
- Another List Item
Lists: Examples
Lists can be used to organize any list of items.
You'd be surprised how often lists are used in web design.
Enough Talk, Let's Code #7
Let's add one of each ordered and unordered lists to our page.
We can make a list of links or even a list of images!
Next Up...
Let's Write Some CSS!

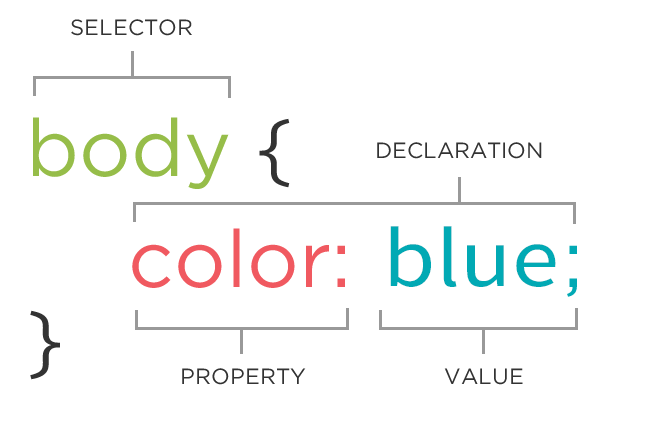
The CSS Rule
The CSS Rule
selector {
   property: value;
}
- A block of CSS code is a rule.
- The rule starts with a selector.
- It has sets of properties and values.
- A property-value pair is a declaration.
CSS Syntax
Declarations: Property and value of style you plan to use on HTML element.
Declarations end with a semicolon
Declaration groups are surrounded by curly brackets.
selector {
    property: value;
    property: value;
    property: value;
}
Connecting CSS to HTML
3 ways
"Inline"
"Embedded"
"External"
Connecting CSS to HTML: Inline
<p style="color:red">Some text.</p>
Uses the HTML attribute "style"
Difficult to use in large projects
Check out your main heading to see it in action
Connecting CSS to HTML: Embedded
<head>
<style type="text/css">
p {
    color: blue;
    font-size: 12px;
}
</style>
</head>
Inside <head> element.
Uses <style> tag
Can only be used in one html file
Can you find an example of this in your code?
Connecting CSS to HTML: Linked
<head>
  <link rel="stylesheet" type="text/css" href="styles.css">
</head>
- Shared resource for several pages
- Reduced file size & bandwidth
- Easy to maintain in larger projects
- Preferred by nerds everywhere!
Take a look at your HTML file
How is it being added to your site?
Hint: look at line #22
Selector: Element
p {
    property: value;
}
Selects all paragraph elements.
img {
    property: value;
}
Selects all image elements.
CSS Color Values
Your browser can accept colors in many different ways:
- Color name (ex. red)
- Hexadecimal value (ex. #FF0000)
- RGB value (ex. rgb(255, 0, 0))
- HSL value (ex. hsl(0, 100%, 100%))
The 17 standard colors are: aqua, black, blue, fuchsia, gray, grey, green, lime, maroon, navy, olive, purple, red, silver, teal, white, and yellow.
Property: Color
The color property changes the color of the text.
p {
    color: red;
    color: #ff0000;
    color: rgb(255, 0, 0);
}
Property: Background-color
The background-color property changes the color of the background.
p {
    background-color: black;
    background-color: #000000;
    background-color: rgb(0,0,0);
}
Enough Talk, Let's Code #8
- Add some rules to your css file
- Change the font color and background color of different types of elements
- Try selecting links, paragraphs, and lists
Property: Font-family
The font-family property defines which font is used. Each property can have one or more comma separated values.
p {
    font-family: "Times New Roman";
    font-family: serif;
    font-family: "Arial", sans-serif;
}
Specific font name
Generic name
Comma-separated list
Property: Font-size
The font-size property specifies the size of the font.
p {
    font-size: 12px;
    font-size: 1.5em;
    font-size: 2rem;
    font-size: 100%;
}
Pixels
"em"
"rem"
Percentage
Property: Fonts (shorthand)
p {
    font-style: italic;
    font-weight: bold;
    font-size: 10px;
    font-family: sans-serif;
}
p {
    font: italic bold 10px sans-serif;
}
Enough Talk, Let's Code #9
- Change the fonts of your page
- Try changing the font sizes and styles for different elements
- Also try using Google Fonts to add a new font to your site
Reusing code
As a general coding principle, Don't Repeat Yourself (DRY).
To reuse CSS, we use IDs and classes.
IDs vs. Classes
ID -- Should only apply to one element on a
webpage, i.e., a webpage only has one footer.
The "#" is how you tell CSS "this is an id."
Class -- Lots of elements can have the same class,
i.e., There can be many warnings on one webpage.
The "." is how you tell CSS "this is a class name."
Selector: ID
Select all element tags with an id of "footer".
CSS
#footer {
  property: value;
}
<div id="footer"><p>Copyright 2023</p></div>
Selector: Class
Select all elements with a class of "warning".
CSS
.warning {
  color: red;
}
<p class="warning">It's a trap!</p>
Enough Talk, Let's Code #10
- Add an ID and/or class to the some of the elements you have already created in your HTML.
- Add CSS rules to target these elements
- Write some styles!
Selector: Position
p em {
  color: yellow;
}
Selects all em elements that are within a paragraph
<p>This is <em>important.</em></p>
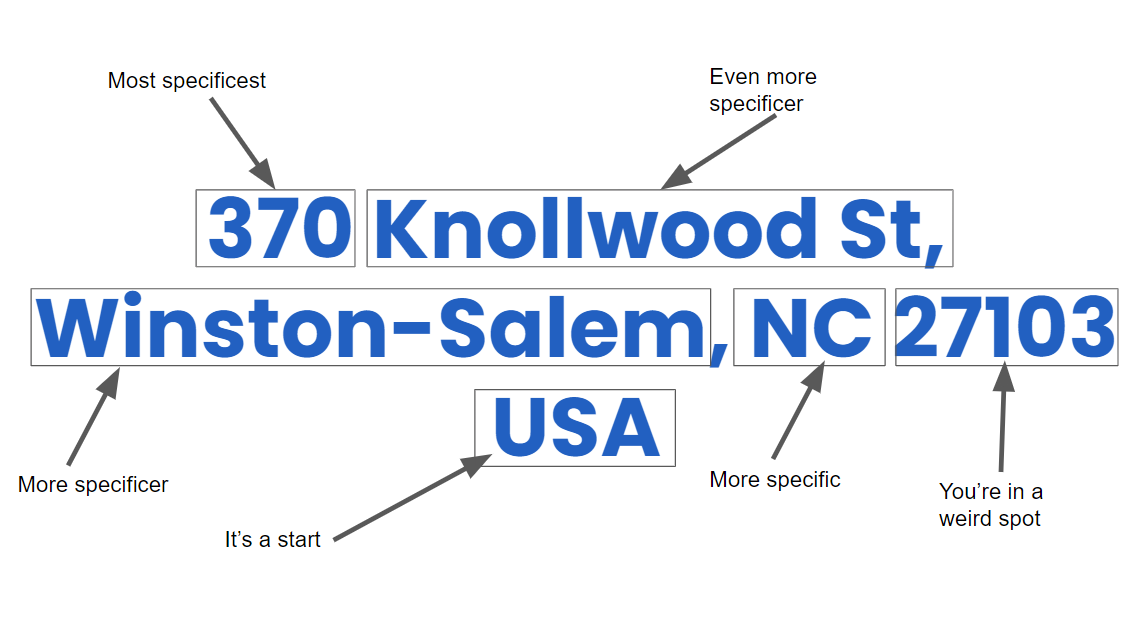
It's like an address

Selector: Position
- Position selectors are more specific
- They look for elements inside other elements
- We seperate nested elements with a space
Selector: Position
So this code:
ul li a strong{
  color: purple;
}
Means "find a strong tag inside a link inside a list item in an unordered list"
<ul>
  <li>
    <a href="programs.html">Our <strong>program</strong></a>
  </li>
</ul>
Cascading
Styles "cascade" down until changed
span {
  color:blue;
  font-family: sans-serif;
}
.red {
  color: red;
}
#special {
  font-family: serif;
}
<p>Paragraph</p>
<p class="red">Paragraph</p>
<p class="red"id="special">Paragraph</p>
Cascading priority
Your browser also assigns priority based on the specificity of the selection. More specific selectors have higher priority.
.main .sale .clearance p { //Most specific
  color: red;
}
.header .title p {
  color: green;
}
.footer p { //Least specific
  color: blue;
}
Cascading priority
The tie-breaker is position. Rules lower in the file overwrite rules higher in the file
.link {
  background-color: yellow;
}
.link {
  background-color: teal;
}
.link { //This rule wins
  background-color: goldenrod;
}
Comma Separated Selectors
CSS also allows you to specify a set of styles to multiple selectors at once.
#content p, footer .container p {
    color: blue;
    background: #fa4224;
}

.cool-paragraph, .list li, .my-link {
    font-weight: bold;
    text-transform: uppercase;
}
You can have as many comma separated selectors as you want. Each CSS element is separated by a space and a comma.
Enough Talk, Let's Code #11
Add some comma separated CSS to your site to apply styles to multiple selectors.
Inline Vs. Block in HTML/CSS
Every HTML element has a default 'display' type. For most, they will
either be 'inline' or 'block'.
Block: a block element will take up the full width of
available space and will stay on its own line.
Inline: an inline element will only take up as much space as the content it has and it will not start on a new line.
Inline Vs. Block Examples
Block: div, h1, p
Inline: img, span, a
Inspect elements below to see how they act in HTML:
This is a heading
This is a paragraph
Inline Vs. Block Force them to change
Using CSS, we can change the default value for the 'display' of an HTML element. So if we wanted the default display of inline to change for an img tag, we could use this css:
img {
    display: block;
}
This will cause the img tag to sit on it's own line and take up as much space as it can.
Adding a span tag
Span tags are primarily used within headings or paragraphs to manipulate certain sections of text.
<p>This is normal text
<span class="highlight">but this is specially colored</span>
but now it's normal text again.</p>
CSS to go with that HTML:
.highlight {
    color: red;
}
Enough Talk, Let's Code #12
Add a span tag with a class on it inside one of your headings or paragraphs. Then style it with CSS.
Pseudo Classes
Pseudo classes are used to target specific HTML elements based on a
change in state, location compared to other HTML elements, and
attributes.
You can target these 'states' by adding a colon (:) after a CSS
selector and then the state of the HTML element you want to target.
Pseudo Classes Example
In the examples below, a:hover would be used if you wanted to change the CSS for a link when someone hovers over them with their mouse.
a:hover {
    color: blue;
}
Enough Talk, Let's Code #13
Using the ":hover" pseudo class, add a hover state to one of your html elements
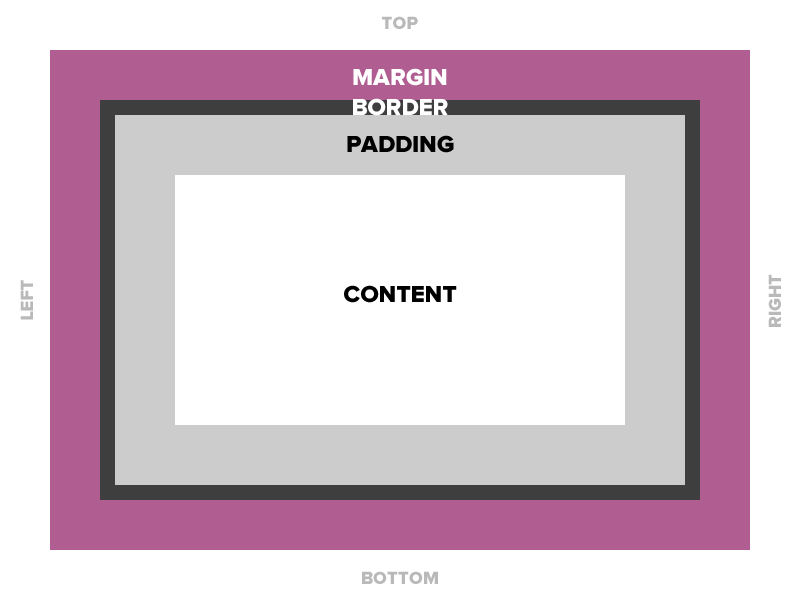
The Box Model

Box Model
All HTML elements can be considered as boxes. In CSS, the term "box model" is used when talking about design and layout.
The CSS box model is essentially a box that wraps around every HTML element. It consists of: margins, borders, padding, and the actual content.
Padding
Space between the border and the content
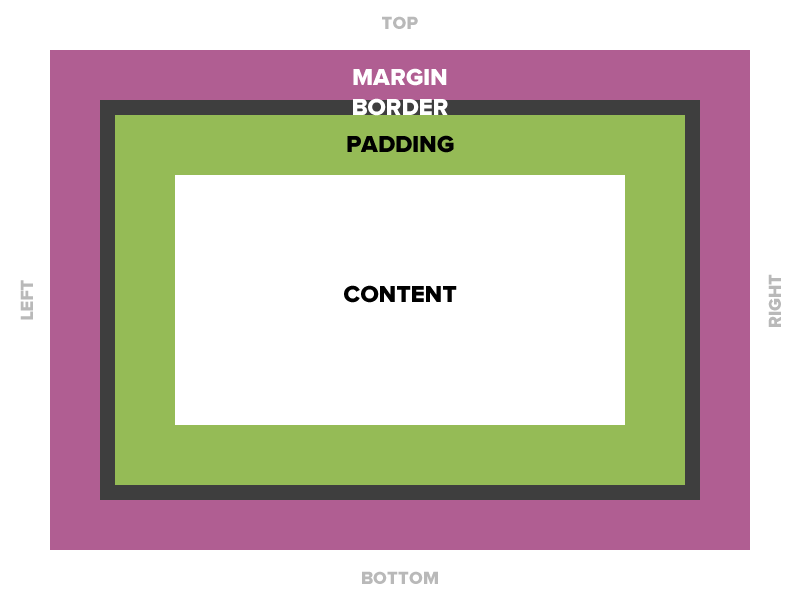
Padding
Notice that the padding adds to the total width of the box.
Padding
15 pixels on all sides
padding: 15px;10 pixels on top only
padding-top: 10px;10 on top, 5 on right, 3 on bottom, 5 on left
padding: 10px 5px 3px 5px;Padding
Four values
padding: top right bottom left;Three values
padding: top right/left bottom;Two values
padding: top/bottom right/left;One value
padding: all;Padding
padding: 10px 20px 30px 40px;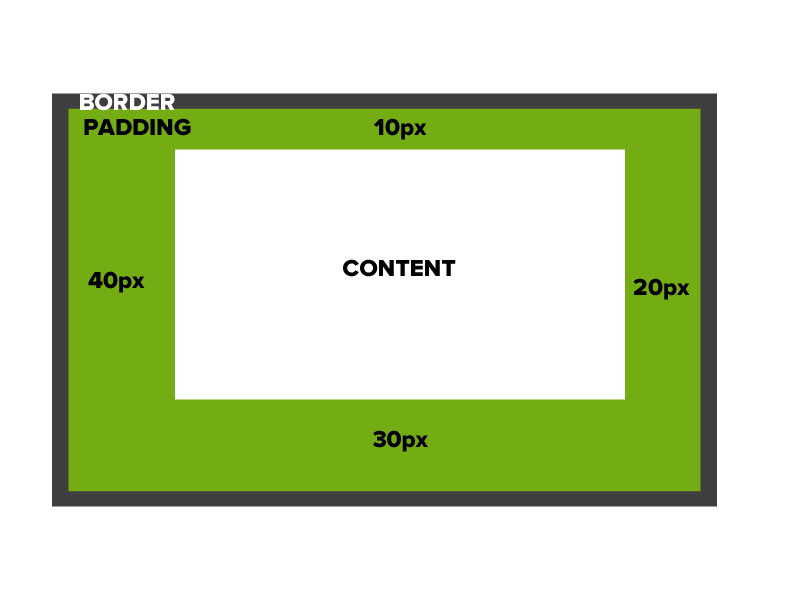
Enough Talk, Let's Code #14
Try adding some padding to some elements.
Remember: you can write out "padding-left", "padding-right", etc. or you can use shorthand declarations.
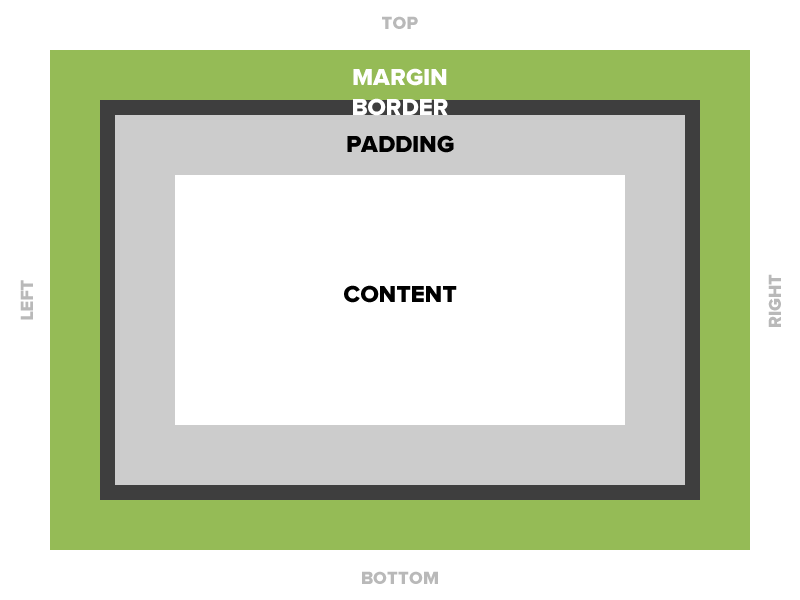
Border
The edge around the box.
Border
Borders are specified as "thickness, style, color."
A solid red border
border: 1px solid #ff0000;A thick dotted black top border
border-top: 4px dotted #000000;Two different border styles
border-top: 1px solid #ff0000;
border-bottom: 4px dotted #000000;
Border - Other Properties
border-width: 10px;
border-style: dashed;
border-color: #666666;
You can specify each property separately, or all three together.
Enough Talk, Let's Code #15
Try adding a border to your images
Experiment with different border styles, thicknesses, and positions.
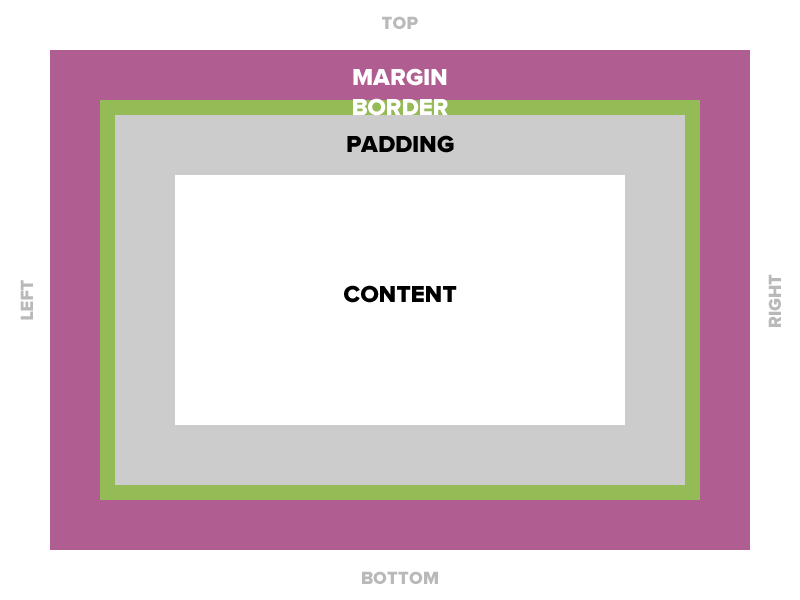
Margin
The transparent area around the box that separates it from other elements by creating whitespace. It can be used to horizontally center an element as well.
Margin
15 pixels on all sides
margin: 15px;10 on top, 5 on right, 3 on bottom, 5 on left
margin: 10px 5px 3px 5px;10 pixels on top
margin-top: 10px;Wrappers
Wrappers are a good way to center content if the screen width is wider than your content.
.wrapper {
  width: 100%;
  max-width: 1200px;
  margin: 0 auto;
}
Enough Talk, Let's Code #16
Center your entire document in the browser by adding a wrapper class with auto margin, width and a max-width.
- Follow along if you get stuck!
CSS Display Property: Flexbox
The Flexible Box Layout Module, makes it easier to design flexible responsive layout structure without using float or positioning.
Flexbox
Before Flexbox, simple layout tasks were very difficult.
- Vertically centering a block of content inside its parent
- Making all the children of a container take up an equal amount of the available width/height
- Making all columns in a multiple column layout adopt the same height even if they contain a different amount of content
- Simple main content and sidebar layout
Flexbox
Flexbox applies to both a container and its direct children.

Flexbox
                .item-container {
                  display: flex;
                }
This defines a flex container; inline or block depending on the given value. It enables a flex property for all its direct children.
Flexbox
                .item-container {
                  .item {
                      flex: 0 1 50%;
                  }
                }
This is the shorthand for flex-grow, flex-shrink and flex-basis combined. The second and third parameters (flex-shrink and flex-basis) are optional. The default is 0 1 auto.
Flexbox
There are plenty of different Flexbox CSS properties that you can find here
We only need display:flex; and flex:0 1 50%; to create a two column layout.
Lets add a sidebar to our website!
Enough Talk, Let's Code #17
Add a new CSS declaration to your wrapper class
display: flex;content, and the other sidebar and add these rules to your CSS
                .content {
                  flex: 0 1 75%;
                }

                .sidebar {
                  flex: 0 1 25%;
                }
Responsive design
You looked at your site on a cell phone and realize it looks terrible and now you need to fix it?
Your sites current layout should look pretty smushed together on a small device
(Hint: shrink your browser!)
What is a Media Query?
A media query is a way of specifying certain CSS at different screen widths.
  @media only screen and (max-width: 750px) {
    body {
      background-color: blue;
    }
  }
The above code states "If the browser/device window is smaller than 750px, then the background color will change to blue."
Adding mobile styles
At the bottom of your CSS file, add the following code:
@media only screen and (max-width: 750px) {
  .content, .sidebar {
    flex: 0 1 100%;
  }
}

.wrapper {
  flex-wrap: wrap;
}
Resize your browser to see how your columns now stack nicely on mobile.
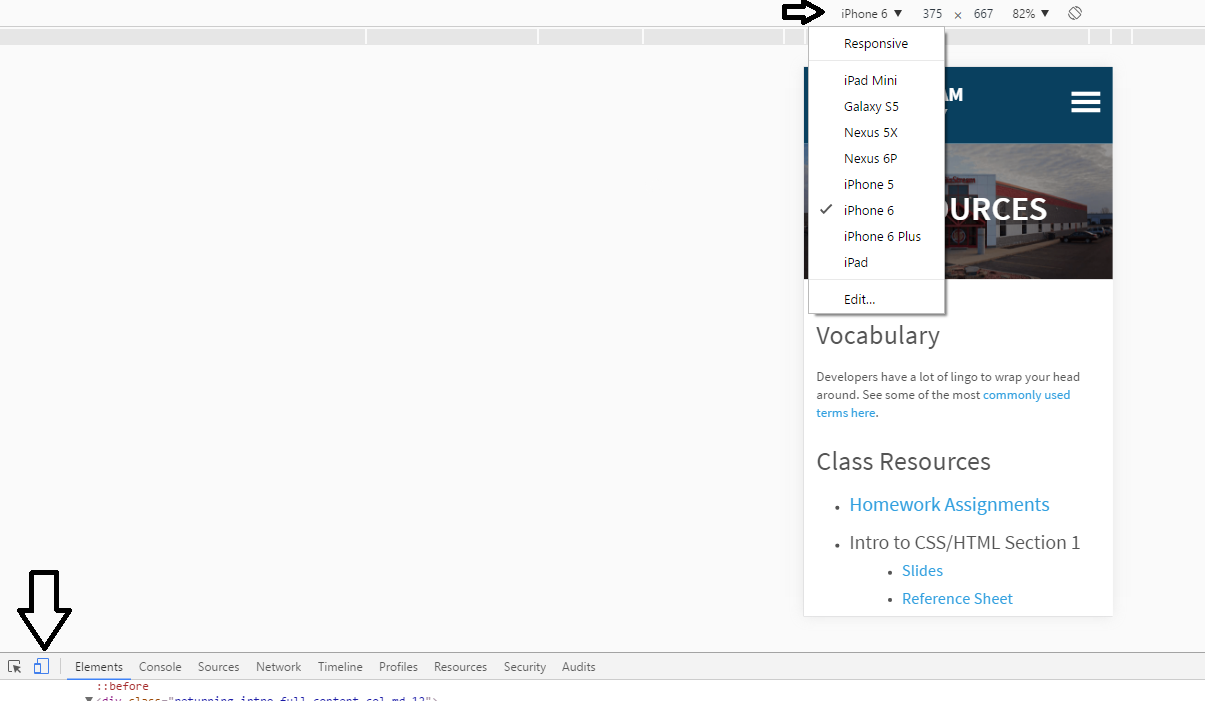
Testing on "mobile" device
JavaScript
What is JavaScript?
JavaScript is a programming language that allows you to implement complex things on web pages
It makes your site dynamic
It is instructions for interactions that happen on your site
(ex. click, scroll, hover)
But lets make this a little easier for you...
What is jQuery?
jQuery is a JavaScript library that makes writing JavaScript for websites easier and more browser friendly.
How do we add the jQuery library to our site?
Before you can start coding jQuery, the library needs to be added to your site.
It should go in the head section of your HTML. Take a second to add this line of code to your site.
<script src="https://ajax.googleapis.com/ajax/libs/jquery/3.0.0/jquery.min.js"></script>
What is a CDN?
A Content Delivery Network
Also called a content distribution network, is an interconnected system of cache servers that use geographical proximity as a criteria for delivering web content.
Document Ready
In order for jQuery to manipulate HTML, it needs to make sure that the HTML is fully loaded before running the jQuery.
$(document).ready(function(event){
// jQuery code goes in here
});
So whenever you write jQuery, you'll need to wrap that code in a document.ready function, as shown below:
$()
$() is a shortcut for jQuery(). The $() is made for selecting an element and then returning that element to perform an action on it.

jQuery Selectors
The following code selects the element that has the ID header in the HTML.
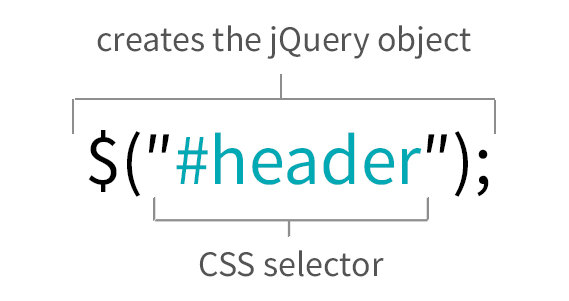
This is how you access HTML elements with jQuery. Once you have the element in the jQuery object, you can do stuff to it.
Enough Talk, Let's Code #18
In your script.js file, remove the console.log and add the following jQuery:
$(document).ready(function(event){
  alert('it works!');
});
Comments
Just like in HTML and CSS, comments are for developers and are not interpreted by the browser.
Your code has two sets of comments. They show the two different ways of formatting comments.
Comments
One is to surround the comment by /* on one side and */ on the other. These comments can be multiple lines long.
        /* This comment
        is three
        lines long. */
Two is to have // before the comment. This kind of comment can only be one line long.
// This comment is only one line long.
jQuery Plugins
Don't Reinvent the Wheel
Because jQuery is widely used, a lot of people have created jQuery code(plugins) that you can download and easily add to your own site.
Using jQuery Plugins on Your Site
jQuery plugins will come with an external file that you will need to download and reference in your site. Then you 'initialize' their jQuery by connecting it to one of your own HTML elements.
Real world example: Accordions
Now we're going to step through together how to add an accordion jQuery plugin.
Enough Talk, Let's Code #19
In the head tag section of your HTML, add these 2 lines of CSS file references:
<link rel="stylesheet" type="text/css" href="//code.jquery.com/ui/1.12.1/themes/base/jquery-ui.css" />
<link rel="stylesheet" type="text/css" href="/resources/demos/style.css" />
AFTER your jQuery script tag in the head tag of your project, add the following:
<script src="https://code.jquery.com/ui/1.12.1/jquery-ui.js"></script>
Enough Talk, Let's Code #20
Setup Your HTML Markup
In your HTML, add the following HTML where you want your slider to appear.
<div id="accordion">
  <h3>Section</h3>
  <div>
    <p>Mauris mauris ante, blandit et, ultrices a, suscipit eget, quam. Integer
  ut neque. Vivamus nisi metus, molestie vel, gravida in, condimentum sit
  amet, nunc. Nam a nibh. Donec suscipit eros. Nam mi. Proin viverra leo ut
  odio. Curabitur malesuada. Vestibulum a velit eu ante scelerisque vulputate.
    </p>
  </div>
  <h3>Section Two</h3>
  <div>
    <p>Mauris mauris ante, blandit et. Proin viverra leo ut
  odio. Curabitur malesuada. Vestibulum a velit eu ante scelerisque vulputate.
    </p>
  </div>
</div>
Initialize your jQuery Accordion
In your script.js file, add the following code:
$(document).ready(function(event){
  $("#accordion").accordion();
});
Questions?
Let's save your projects!
Presentations!
And... we are done!
Thank you for attending BizStream Academy
We hope you had fun and learned something new today
You now have the project and skill sets to keep coding!